
Use In Vehicle Charge to charge a battery installed and connected in a vehicle using test parameters determined by vehicle VIN or year, make, and model of the vehicle being tested.
NOTE: An In Vehicle Test will always associate the in-vehicle battery with the VIN of the vehicle in which it is installed.
At any time during the test, tap ![]() to return to the previous screen; or
to return to the previous screen; or ![]() to return to the Main Menu.
to return to the Main Menu.
Battery Test
- Connect the charger clamps to the appropriate battery posts.
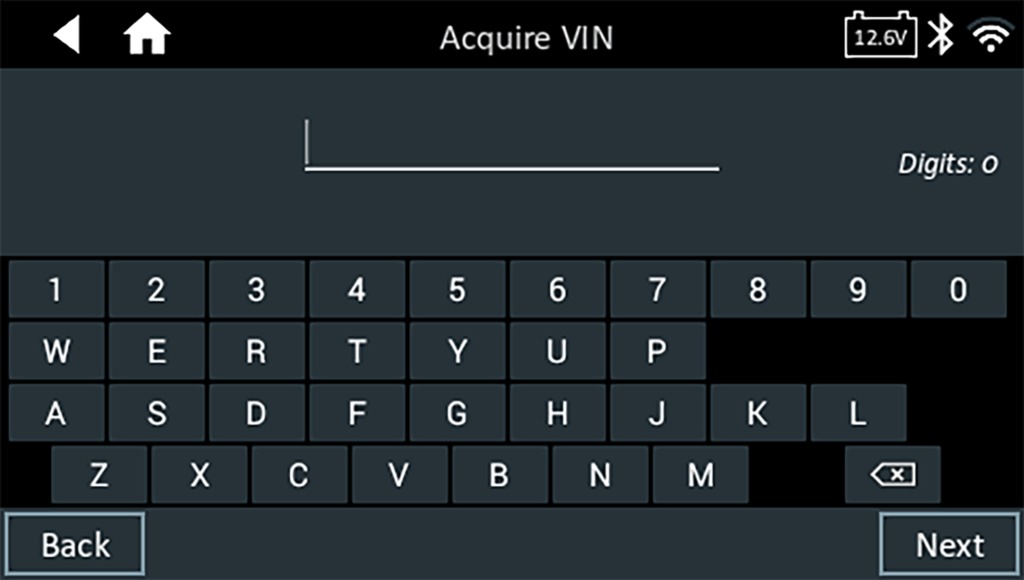
- At the Main Menu, tap In Vehicle Charge. The Acquire VIN screen is displayed.
- Use a connected bar code scanner to scan the VIN bar code, usually located on the driver’s side door frame. A paired CVG can also be used. The VIN can also be entered manually. For best results, use the barcode located on the driver’s side door frame. The VIN is also displayed behind the windshield on the driver’s side dashboard.
Driver’s Door Frame:

Windshield:

CVG Module:

Manual Entry:
Use the on-screen keypad to manually type the 17-digit VIN — the displayed digit counter will count up the alphanumeric characters as they are entered on the keypad. Tap NEXT.
NOTE: Refer to the VIN Scanning Procedure article for recommended scanning procedures and VIN scanning help.
4. The Edit Battery information screen displays vehicle and battery information based on the VIN.

If the displayed information is correct, tap Next to begin the Battery Test or Reset to reset the parameters to the factory defaults.
NOTE: For new, previously untested VIN, confirm and manually enter the CCA. The entered value will be matched to the VIN and used for future testing. Always confirm battery CCA in case the battery was replaced/changed between battery tests.
5. Tap the box across from each displayed parameter and select the correct information from the displayed list.
NOTE: See the Battery Information Definitions article for complete parameter descriptions..
NOTE: Tap Find Battery to search for the battery location for the vehicle year, make, and model based on the VIN or manually selected vehicle year, make, and model.
The charger performs a series of tests to determine the overall condition of the battery before applying a charge. Those steps include measuring the ambient battery temperature, Cranking Health, Reserve Capacity, Charge Acceptance, and applying a Load Test to the battery.
The test results are then displayed on the charger screen.
NOTE: If the CVG was used to acquire the VIN, the Edit Battery Information screen is displayed (See Step 3). Tap Next to display the test results.


Icons are color-coded to indicate status:
- GREEN: All test parameters were completed and have passed
- RED: The battery has failed the test
- YELLOW: Some test parameters may require further testing
- WHITE: Insufficient date to perform the test
To print or send the test to a configured printer or via email, tap Send Results and select an option. To continued with the System Test, tap System Test. To return to the Home Screen, tap Done.
NOTE: Refer to the Test Results Decision Tables article for a complete definition of possible test results.
System Test
- Start the engine and let it idle.
- Turn off all electrical accessories such as headlights and the interior ventilation blower fan and tap Next.
- The analyzer tests the alternator output at idle.
- When prompted, rev and hold the engine to between 2000 to 3000 RPM and tap Next.
- The analyzer tests the alternator output again.
- When prompted, return the the engine to idle.
- Turn on the high beam headlights and interior ventilation blower motor and tap Next.
- The analyzer tests the alternator output at idle.
- When prompted, rev and hold the engine to between 2000 to 3000 RPM and tap Next.
- The analyzer tests the alternator output again.
- When prompted, turn off all loads and idle the engine.
- Tap Next to display the test results.
System Test Results – Summary
A Test Results Summary screen is displayed following a System Test. Tap
![]()
to view detailed test results for each part of the test.

To send the test results to a configured printer or via email, tap Send Results and select an option. To return to the Home Screen, tap Done or ![]() to return to the Main Menu.
to return to the Main Menu.
NOTE: Refer to the Test Results Decision Tables article for a complete definition of possible test results.